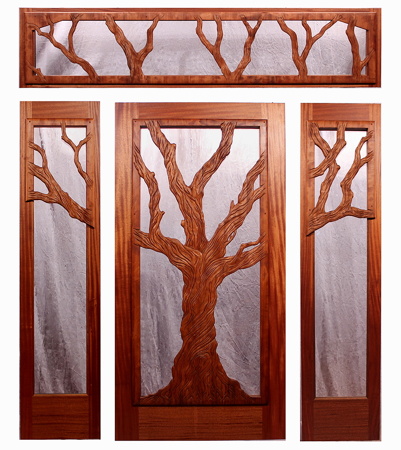
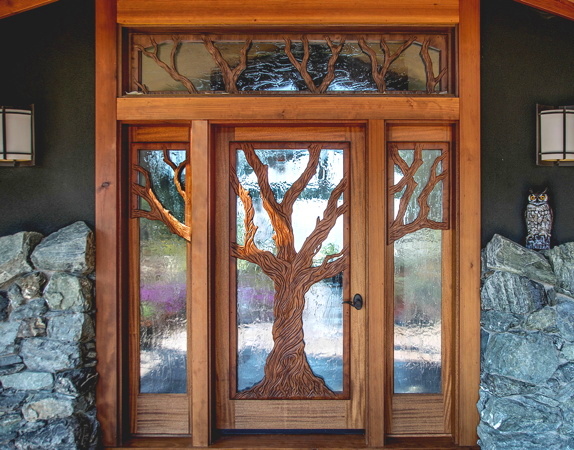
This is
The Simcha Grand Entry
The Door, Sidelights, and Transom
are all vertical grain Ribbon Grain Mahogany
with a overlaid Hand Carved Tree of VG Redwood Laminate
The Carving is by Ken Davis of Mendocino
The Door is 42" x 84" x 1-3/4"
with 2 - 22" sidelights and a 20"(high) transom above

Here is the completed entry. The door has 5 ball bearing hinges due to the weight

Here is The Simcha Grand Entry installed on its' beautiful home

CLICK on Images to Enlarge
102.jpg

103.jpg

104.jpg
Here is the left sidelight

here is a close-up of the door

and the right sidelight

104a.jpg

105.jpg

106.jpg
here is the completed transom

here is a conceptual rendering

The original drawing for the carving.

107.jpg

108.jpg

109.jpg
Check out the hand carved detailing

Close up view of a limb from the transom.

Another view.


110.jpg

111.jpg

112.jpg
Look at the detail in the carving on this sidelight.

all of this is hand carved on a laminated cross banded VG Redwood planks

So much detail in the trunk of the tree.


112a.jpg

113.jpg

113a.jpg
The door has dual paned tempered glass, using a semi-obscure glass called Seedy Reamy

This door will look spectacular at night also.

The glass adds a very distinctive look for the background.


113b.jpg

CLICK on Images to Enlarge

114.jpg

Here's my sweetie


Below is the provenance of the making of this grand entry

201e.jpg

202.jpg

203.jpg
The lumber used in this door has very tight grain.

Getting the lumber ready.

More ruffed out lumber.


204.jpg

205.jpg

206.jpg
Fitting the door.

Time to get ready to glue up.

All the corners are cleaned using a toothbrush


207.jpg

208.jpg

209.jpg
Gluing up of the door.

More clamps please.

This door has got to get flat.


210.jpg

211.jpg

212.jpg
Cleaning the corners with a tooth brush to get out all the glue.

The door is glued up and three more pieces to go to get ready for this beautiful entry.

Sidelights done and now we wait for about 72 hours for them to dry.


213.jpg

214.jpg

215.jpg
The transom is finally glued up.

Now we wait for the transom to dry.

All of the pieces are out off clamps and ready to be sanded on.

216.jpg

217.jpg

218.jpg
This is a photo of the rough lumber.

Planing the lumber down to size.

All of the pieces are resawed into thick veneers
219.jpg

220.jpg

221.jpg
Re-sawing the lumber to make veneers for the panel that will be turned into a carving.

and each board on the face of the carving will come from the same Redwood tree

222.jpg

223.jpg

224.jpg
A stack of veneers to be glued up to create a panel for the carving.

Gluing up the veneers.

Here is the full face of the carving wood
225.jpg

226.jpg

227.jpg
Nice tight flat panels.

More panels being glued up.

Even more panels being glued up, WOW, This is a big project.


228.jpg

229.jpg

230.jpg
These are for the sidelights

Coming out of clamps.

Time to clean them up with a little TLC.

231.jpg

232.jpg

233.jpg
More!!!!!!! Your right I forgot the transom.

Getting them done.

Just a little more to go.
234.jpg

235.jpg

236.jpg
Running the panels through the dimensional sander.

Look at those thick veneers

Looking good!!!!!!!!!!
237.jpg

238.jpg

239.jpg
Now they are ready to be glued up again!!

Gluing the veneers together to create a strong thick panel for the carver to get to work on his art work.

Rolling on the glue.


240.jpg

241.jpg

242.jpg
This piece is ready for glue.

We use plenty of glue.
243.jpg

244.jpg

245.jpg
Wrapping the glued panel up so we can put it in the vacuum press.

Nice and tight so the glue wont leak out.

More to go.
246.jpg

247.jpg

248.jpg
Here the panel will set in the vacuum press for about 72 hours.

Another panel in the vacuum press.

and yet another one.
249.jpg

250.jpg

251.jpg


Panels out of the vacuum press and ready to be sanded.

252.jpg

253.jpg

254.jpg


255.jpg

256.jpg

257.jpg

The original drawing.

The Transom panel which is to carved.

260.jpg

261.jpg

262.jpg
The rough drawing on the panel.

What a transformation.

Sidelight drawing on a panel.
263.jpg

264.jpg

265.jpg
The rough cut out.

The left panels rough drawing.

Ready for the fine carving work to start.

266.jpg

267.jpg

268.jpg
And it begins.

A very time consuming project.

Such detail!
269.jpg

270.jpg

271.jpg


272.jpg

273.jpg

274.jpg
Fine hand sanding the edges and corners.

More hand sanding on the molding detail.


Are we having to much fun? You bet!!!!!!!!
275.jpg

276.jpg

277.jpg
We begin the slow process of oiling the door,sidelights and the transom.

Look at the beautiful ribbon grain mahogany come to life.


This transom will be stunning.
277a.jpg

278.jpg

279.jpg
Hanging to dry.

Getting the lumber ready for the jambs.


This jamb system is ready to be sanded and then oiled.
280.jpg

281.jpg

281a.jpg
They are looking good.

The jambs are set to dry for 3 days before being oiled again.


and again.
282.jpg

283.jpg

284.jpg
Pre fitting the transom

Pre hanging the jambs.


Everything must be precise.
285.jpg

286.jpg

287.jpg

Fitting the glass into the sidelights.


The long awaited carving gets its first oiling.
288.jpg

289.jpg

290.jpg
Look at the carving come to life,and it still has 3 more oilings to go.

The oiling really brings out the detail in the carving.

Each piece is given special attention.


291.jpg

292.jpg

293.jpg

Now they dry and wait for the next oiling.

Time to fit into the door with the glass.

Looking good.


294.jpg

295.jpg
The last item to arrive and be oiled.
The transom

The finished Transom.


RETURN TO MY DOOR GALLERY

RETURN TO WORK IN PROGRESS