|
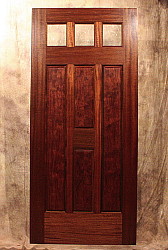
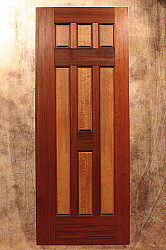
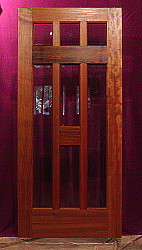
Here are The Palisades Doors! The Entry Door is Mahogany with Bubinga Panels and beveled opaque glass. The Pocked and Powder Rood Doors are Redwood with Striated Fir panels. The Loft Door is Old Growth Redwood and beveled insulated glass. |
|
|
||||||||||||||||||||||||||||||||
|
|
||||||||||||||||||||||||||||||||
|
|
||||||||||||||||||||||||||||||||
 |
 |
 |
||||||||||||||||||||||||||||||
|
|
|
|
||||||||||||||||||||||||||||||
|
|
||||||||||||||||||||||||||||||||
 |
 |
 |
||||||||||||||||||||||||||||||
|
|
|
|||||||||||||||||||||||||||||||
|
|
||||||||||||||||||||||||||||||||
 |
 |
 |
||||||||||||||||||||||||||||||
|
|
|
|
||||||||||||||||||||||||||||||
|
|
||||||||||||||||||||||||||||||||
 |
 |
 |
||||||||||||||||||||||||||||||
|
|
|
|
||||||||||||||||||||||||||||||
|
|
||||||||||||||||||||||||||||||||
 |
 |
 |
||||||||||||||||||||||||||||||
|
|
|
|
||||||||||||||||||||||||||||||
|
|
||||||||||||||||||||||||||||||||
 |
 |
 |
||||||||||||||||||||||||||||||
|
|
|
|
||||||||||||||||||||||||||||||
|
|
||||||||||||||||||||||||||||||||
 |
 |
 |
||||||||||||||||||||||||||||||
|
|
|
|||||||||||||||||||||||||||||||
|
|
||||||||||||||||||||||||||||||||
 |
 |
 |
||||||||||||||||||||||||||||||
|
|
|
|
||||||||||||||||||||||||||||||
|
|
||||||||||||||||||||||||||||||||
 |
 |
 |
||||||||||||||||||||||||||||||
|
|
|
|||||||||||||||||||||||||||||||
|
|
||||||||||||||||||||||||||||||||
 |
 |
 |
||||||||||||||||||||||||||||||
|
|
|
|
||||||||||||||||||||||||||||||
|
|
||||||||||||||||||||||||||||||||
 |
 |
 |
||||||||||||||||||||||||||||||
|
|
|
|
||||||||||||||||||||||||||||||
|
|
||||||||||||||||||||||||||||||||
 |
 |
 |
||||||||||||||||||||||||||||||
|
|
|
|||||||||||||||||||||||||||||||
|
|
||||||||||||||||||||||||||||||||
 |
 |
 |
||||||||||||||||||||||||||||||
|
|
|
|
||||||||||||||||||||||||||||||
 |
 |
 |
||||||||||||||||||||||||||||||
|
|
|
|
||||||||||||||||||||||||||||||
|
|
||||||||||||||||||||||||||||||||
 |
 |
 |
||||||||||||||||||||||||||||||
|
|
|
|||||||||||||||||||||||||||||||
|
|
||||||||||||||||||||||||||||||||
 |
 |
|||||||||||||||||||||||||||||||
|
|
||||||||||||||||||||||||||||||||
|
Here are The Palisades Doors! The Entry Door is Mahogany with Bubinga Panels and beveled opaque glass. The Pocked and Powder Rood Doors are Redwood with Striated Fir panels. The Loft Door is Old Growth Redwood and beveled insulated glass. |
|
|
||||||||||||||||||||||||||||||||
|
|
||||||||||||||||||||||||||||||||
|
|
||||||||||||||||||||||||||||||||
|
|
|
|
||||||||||||||||||||||||||||||
|
|
|
|
||||||||||||||||||||||||||||||
|
|
||||||||||||||||||||||||||||||||
|
|
|
|
||||||||||||||||||||||||||||||
|
|
|
|||||||||||||||||||||||||||||||
|
|
||||||||||||||||||||||||||||||||
|
|
|
|
||||||||||||||||||||||||||||||
|
|
|
|
||||||||||||||||||||||||||||||
|
|
||||||||||||||||||||||||||||||||
|
|
|
|
||||||||||||||||||||||||||||||
|
|
|
|
||||||||||||||||||||||||||||||
|
|
||||||||||||||||||||||||||||||||
|
|
|
|
||||||||||||||||||||||||||||||
|
|
|
|
||||||||||||||||||||||||||||||
|
|
||||||||||||||||||||||||||||||||
|
|
|
|
||||||||||||||||||||||||||||||
|
|
|
|
||||||||||||||||||||||||||||||
|
|
||||||||||||||||||||||||||||||||
|
|
|
|
||||||||||||||||||||||||||||||
|
|
|
|||||||||||||||||||||||||||||||
|
|
||||||||||||||||||||||||||||||||
|
|
|
|
||||||||||||||||||||||||||||||
|
|
|
|
||||||||||||||||||||||||||||||
|
|
||||||||||||||||||||||||||||||||
|
|
|
|
||||||||||||||||||||||||||||||
|
|
|
|||||||||||||||||||||||||||||||
|
|
||||||||||||||||||||||||||||||||
|
|
|
|
||||||||||||||||||||||||||||||
|
|
|
|
||||||||||||||||||||||||||||||
|
|
||||||||||||||||||||||||||||||||
|
|
|
|
||||||||||||||||||||||||||||||
|
|
|
|
||||||||||||||||||||||||||||||
|
|
||||||||||||||||||||||||||||||||
|
|
|
|
||||||||||||||||||||||||||||||
|
|
|
|||||||||||||||||||||||||||||||
|
|
||||||||||||||||||||||||||||||||
|
|
|
|
||||||||||||||||||||||||||||||
|
|
|
|
||||||||||||||||||||||||||||||
|
|
|
|
||||||||||||||||||||||||||||||
|
|
|
|
||||||||||||||||||||||||||||||
|
|
||||||||||||||||||||||||||||||||
|
|
|
|
||||||||||||||||||||||||||||||
|
|
|
|||||||||||||||||||||||||||||||
|
|
||||||||||||||||||||||||||||||||
|
|
|
|||||||||||||||||||||||||||||||
|
|
||||||||||||||||||||||||||||||||