The door is
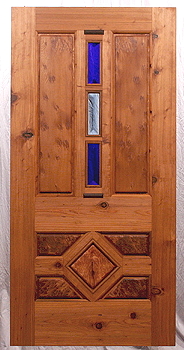
The Mitchell Creek Entrance Door
It is made of Knotty Redwood
with Redwood Burl
and "cats paw" panels
with hand beveled cobalt blue glass

It is 36" x 78" x 1-3/4"

Here is the completed door ~ it's a beauty !!

102.jpg

Click on Any picture to Enlarge

103.jpg
here is the original "ideas" drawing

another view and ready to hang

104.jpg

105.jpg

106.jpg
Here is the glass viewed with backlight

so warm and welcoming

It is Diamante Starfire with cobalt glass laminated to the Starfire

107.jpg

108.jpg

109.jpg
This light blue piece of Starfire is beveled on both sides

Here, the top panels are Old Growth Redwood with a "cats paw" figuring

see why it is called "cats paw"


110.jpg

111.jpg

112.jpg
more of the top view

The glass is a full 1" thick and it is hand beveled and polished.

I added a Rosewood detail block to "fill" in some extra space.

113.jpg

113a.jpg

114.jpg
This door will have an Emtek keypad touch lock

another view to feed your senses !

Here are the lower Redwood Burl panels. I really like the Knotty Redwood to add to the design

115.jpg

116.jpg

117.jpg
and a closer view

a picture of the upper panels

Here is a view of the Inside of the door


118.jpg

120.jpg

121.jpg
It will have polished Brass hardware on the inside

The center glass is beveled on two sides

this is really a rich dark cobalt blue

122.jpg

123.jpg

124.jpg
Here is a close up of the Rosewood Detail

and on the top also

I really like the end result

125.jpg

126.jpg

127.jpg
Here is a view of the inside burl panels. They are all bookmatched

and individually amazing

and the center panel goes "bang"


Here is the provenance of the making of this elegant door.

201.jpg

Click on Any picture to Enlarge

202.jpg
Here is the final door I presented to my client ...... he loved it !

I had some knotty Redwood I had saved from a log fallen on my land

203.jpg

204.jpg

205.jpg
here is the "diamond" after machining

I glued it together first.

here is the door frame being laid out

206.jpg

207.jpg

207a.jpg
laying out more pieces

and the top half

well here's a duplicate picture

208.jpg

209.jpg

210.jpg
Here I'm fitting the "diamond"

the we bore for splined tennons

and the I fit the horizontal rails

211.jpg

212.jpg

213.jpg
and I start to glue up all the pieces. Note I have a temporary piece in the center to keep it from collapsing with pressure

here are the short mullions

that fit into the mid vertical rails

214.jpg

215.jpg

216.jpg
and here we start to glue up this tricky door

here is the door clamped up with 15 clamps

the we clean up all the excess glue

217.jpg

218.jpg

219.jpg
after curing in in clamps for 4 days, it comes out of clamps

here I'm sanding the burl for the center "diamond"

here's a close-up

220.jpg

221.jpg

222.jpg
isn't it beautiful ?

the Zoey starts hand sanding, even before we have a bench available

here are all the lower panels fitted before finishing

223.jpg

224.jpg

225.jpg
Here is a little Rosewood insert that I placed above and bellow the hand beveled glass

Nice touch

Here the panels are being sanded to a furniture finish

226.jpg

227.jpg

228.jpg
here we are had fitting and cutting the complex stops

and all of the molded edges are hand sanded

here the panels are oiled with 4 coats of varnish oil

229.jpg

230.jpg

240.jpg
the oil soaks in and cures for 3-4 days before the next oiling

here is the door, completely sanded and ready to oil

and the Rosewood insert is finished too

241.jpg

242.jpg

242a.jpg
there were some small voids which I decided to seal with clear epoxy. It worked well.

I filled a couple of other voids

Here is the umbrella under which we oiled our doors

243.jpg

244.jpg

245.jpg
Here the door is being oiled by Akili

The door will be oiled with 4 coats of varnish oil

and it cured for at least 3 days between coats

246.jpg

and here is the final coat. Each coat saturates the door for at least 1-1/2 hrs

RETURN to Our Gallery of Doors

RETURN to Work in Progress