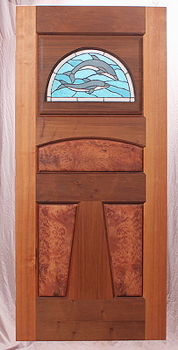
This door is called
The Dolphin 2 Entry Door
It is a similar to The Gulf Coast Dolphin Entry.
It is Old Growth vertical grain Redwood
It is 36" x 80" by 1-3/4"
The beautiful stained glass is by
Zoleta Lee Designs
Here is the completed Dolphin Entry Door

102.jpg
103.jpg
104.jpg
Both the Beautiful Redwood and the Stained Glass complement each other.
CLICK HERE to view the making of The Dolphin stained glass by Zoleta Lee
These Beautiful Redwood Burl panels really make this door stand out.

105.jpg
106.jpg
107.jpg

Brian really has a knack for matching wood and textures together.

201.jpg
 

Below is the provenance of the making of
The Dolphin 2 Entrance Door


Click on Any Image to Enlarge
or use the slide show arrows

202.jpg
Even this black and white photo shows the Magnificent beauty of this door.

Here the door is being fitted for the final stage before gluing up.

203.jpg
204.jpg
205.jpg
Here the curve is being cut before gluing.

The gluing up of the door has begun, many clamps are used.
The cleaning up of the glue gets just as much attention as the gluing up does.

206.jpg
207.jpg
208.jpg
Here the door will lay for 72 hours to dry and cure.

Out of clamps and ready to start the process of sanding.
The hand sanding often takes several hours.

209.jpg
210.jpg
211.jpg
All of the molded edges are hand sanded
Here we are gluing up the panels for the stained glass

212.jpg
213.jpg
214.jpg
These panels will lay in clamps for 72 hours also.

The panels are out of the clamps and ready to be cut to shape and sanded.
Here Brian is cutting the panels to fit the curve of the door.

215.jpg
216.jpg
217.jpg

Hand machine sanding really brings out the luster in these panels.
Hand sanding of the panels.

218.jpg
219.jpg
220.jpg
What a Beautiful shine from the oil, and the oil really brings out the texture in these panels.

This door is finally ready for its first oiling.
The Dolphin 2 Door has been oiled 4 times to get this rich color.

221.jpg
222.jpg
223.jpg
Here the Panels are being fitted with stops.

The curved stop is a very tricky stop to fit. These stops are steamed bent to get the curve just right.

224.jpg
225.jpg
226.jpg
Here Brian is hand shaping the curve for this door.

A nice tight fit and clamping on the edges is just the beginning of the top of this door.

227.jpg
228.jpg
228a.jpg
Here Brian is hand chipping some of the corners to get just the right fit for the Stained Glass that will be going into this opening.

Every inch of our doors are given attention to detail.
The Glass fits nice and tight, what a door this is going to be!

229.jpg
230.jpg
231.jpg
Now the oiling of the top of the door has begun.

The final oiling of the top panel and now the door will soon be ready for it's new home.
The finished door!

RETURN to our Gallery